Testing DFIR-Orc and Kape artifact collection tooling
Introduction
This case study focuses on testing forensic tools and procedures for DFIR (Digital Forensics and Incident Response) and Kape activities. It aims at forensic experts to be trained and ready for cyber incident missions.
This tutorial focuses on assessing the working of two forensic tools: DFIR-Orc and Kape for collecting pre and post artifacts from attacks on a system. Thanks to the M&NTIS platform, attack scenarios automatically running in labs can be played. Then, forensic tools can be deployed on running machines before and after different attacks.
This tutorial focuses on the Windows attack scenario named Lumidus and on the forensic tool named DFIR-Orc. However, the playbook for deploying Kape performed too if you run forensic.py "as is".
During the Lumidus scenario, a ransomware is deployed on every machine of the lab to cipher user's files. As a forensic analyst, we want to test several tools for training purposes. Thanks to the M&NTIS platform, it is possible to inspect virtual machine's state before and after the ransomware's execution using the custom pause handling feature.
In this tutorial, you will discover how to setup pauses, and how to deploy your own forensic tools on virtual machines of the lab. First, the setup of M&NTIS Command Line Interface (CLI) is presented. Then, the configuration of different files is explained to perform such an analysis. Next, the retrieval of forensic artifacts from the machines is explained. Finally, the inspection of the retrieved files is explained to understand part of the ransomware's behavior.
Getting Started
M&NTIS CLI setup
Follow these steps to setup the CLI tool:
# create a new virtual environment
python3 -m venv ~/mantis_venv

# use this new venv
source ~/mantis_venv/bin/activate

# M&NTIS CLI installation
(mantis_venv) python3 -p pip install mantis_api_client

# login to the mantis realm
(mantis_venv) mantis account login --domain mantis-platform.io
You are now logged in to the M&NTIS Platform ! Now you are able to retrieve the attack list for a scenario. Based on this, you will be able to create the yaml configuration file for specifying where the scenario should pause.
# Get all the scenario list
(mantis_venv) mantis scenario list

# Get the infos about a scenario
(mantis_venv) mantis scenario info lumidus
In this last command line, the output is:
[+] Attacks available:
       - api_control
       - nginx_server
       - exe_reverse_api
       - ad_discover
       - port_scan
       - netbios_scan
       - intern_zerologon
       - intern_secretdumps_smb
       - lateral_remote_control
       - list_ad_computers
       - ransomware
In this tutorial, we want to pause before and after ransomware execution. So the pause has to be set to "ransomware".
Defining at which step to collect artifacts
In M&NTIS, it's possible to perform custom pauses during an attack scenario execution or even to do a step-by-step run of the scenario, at the attack level. There are two ways to achieve this: by using the web frontend or directly from the M&NTIS CLI.
M&NTIS web frontend custom pauses
Once you are logged in the M&NTIS platform, click on "Scenarios":

Click on "View More" on the Lumidus scenario:

Create a lab:

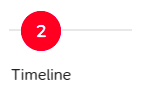
Click on timeline:
You can choose either the "step by step" if you want the lab to stop on every attack or "Custom" to choose where you want to pause the scenario. That's it! While running, you will receive notifications from scenario when a pause is performed.
M&NTIS CLI custom pauses
You can create a lab_config.yaml file containing for example the following:
scenario_execution_mode: "custom"
step_waiting_list: ["ransomware"]
As explained earlier, the scenario execution has to stop at the ransomware step.
Deploy a custom playbook
This is currently only possible using the M&NTIS CLI, as described in the previous section.
The forensic.py file shows how to start the Lumidus scenario and how to handle the pauses happening before and after the ransomware's attack.
During the pause, the forensic tool Kape is deployed in order to retrieve artifacts. Its playbook is played on Windows machines of the simulation. You can get more details and custom the Kape configuration by editing the files in provisioning/deploy-kape.
The playbook.yaml file describes the operations performed by ansible. The last step of the playbook is used to export the files from the virtual machine of the lab to the host. You can choose any protocol you want to retrieve your files. In the playbook, HTTP is used.
You can create any playbook you want under the provisioning folder. Then, it shall contain at least a playbook.yaml file for ansible.
The variables under the {{ variable }} brackets can be provided from the python script to the playbook.yaml file at runtime or either as environment variable from ansible directly. The next example is the playbook used for deploying DFIR-Orc on virtual machines.
---
gather_facts: True
strategy: free
tasks:

- name: Copy DFIR-Orc_x64.exe to temporary folder
  ansible.windows.win_copy:
    src: files/DFIR-Orc_x64.exe
    dest: C:\Users\Public\DFIR-Orc_x64.exe
  when: cyber_range_system_type == 'windows'

###########################################
# Launching the fastir_artifacts executable
###########################################
- name: Launching the fastir_artifacts [Windows]
  ansible.windows.win_powershell:
    script: |
      C:\Users\Public\DFIR-Orc_x64.exe NTFSInfo /out=C:\Users\Public\{{ ansible_facts['hostname'] }}_C_drive_{{ state }}.zip "C:\"
  when: cyber_range_system_type == 'windows'

###########################
# Uploading the script file
###########################
- name: Uploading the script file
  template:
    dest: C:\Users\Public\upload.ps1
    src: files/script.ps1
  when: cyber_range_system_type == 'windows'

#########################
# Uploading the file HTTP
#########################
- name: Run PowerShell script with fallback IPs
  ansible.windows.win_shell: C:\Users\Public\upload.ps1
  when: cyber_range_system_type == 'windows'
Share files from the lab
The playbook uses a powershell script named upload.ps1 for exporting the archives to an HTTP Webdav compatible machine of the simulation. The variables are provisioned from the main python script as extra variables.
$ipList = @{{ ip_list }}
$filePath = "C:\Users\Public\{{ ansible_facts['hostname'] }}_C_drive_{{ state }}.zip"
$success = $false
foreach ($ip in $ipList) {
    try {
    Invoke-WebRequest -Uri http://$ip/webdav/forensic/{{ansible_facts['hostname']}}/dfir/{{ state }}/C_drive.zip -UseBasicParsing -Method Put -InFile $filePath -ContentType "application/octet-stream"
        $success = $true
        break
    } catch {
        Write-Host "Failed to upload to $ip $($_.Exception.Message)"
    }
}
if (-not $success) {
    throw "Failed to upload to all IPs in the list."
}
Share and receive files with the lab
Once you have retrieved the lab id (uuid format), you can view all accesses with can be performed from a host. The provisioning_relay docker is a relay to share files with the lab. It is from its remote access that files can be sent or downloaded to and from the lab. Such access can be retrieved from the M&NTIS command line:
# Get your running lab ids
(mantis_venv) mantis labs

[+] Available labs:
  [+] ID: e4c1b519-4881-43fd-861c-33000626f65e
        [+] Lab start time: 2025-02-18 12:47:46 UTC
        [+] Status: ScenarioExecutionStatus.scenario_finished
        [+] Type: ContentType.ATTACK

# Copy to your browser "HTTP URL" of provisioning_relay
(mantis_venv) mantis lab e4c1b519-4881-43fd-861c-33000626f65e remote-access
[+] Lab remote access information:
[+] Lab ID: e4c1b519-4881-43fd-861c-33000626f65e
  [+] Node name: provisioning_relay
    [+] HTTP URL (noVNC): https://app.mantis-platform.io//proxy/e4c1b519-4881-43fd-861c-33000626f65e/relay/provisioning_relay/
[...]
The web server is compatible with WEBDAV. You can upload files to the lab directly from your browser or by using curl (if you need to create extra folders). This web server is available after the first required provisioning step has been started.
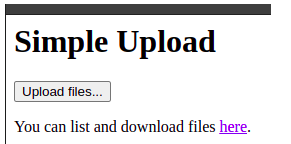
You can either use the form to upload your files. They will be uploaded to the /uploads sub-folder. You can chose to upload a file with curl at the path of your choice:
curl -T ransomware.exe https://app.mantis-platform.io/proxy/e4c1b519-4881-43fd-861c-33000626f65e/relay/provisioning_relay/webdav/1/provisioning_playbooks/data/my_uploads/ransomware.exe
my_uploads directoryRetrieve collected artifacts
In Lumidus scenario, the ransomware attack is performed two times. The first time is against ADMIN1 and CLIENT1 machines at once, whereas it is only performed against dcserver the second time.
The file tree for dcserver after the scenario is performed looks like the following:
-- dcserver
    |-- dfir
    |   |-- after
    |   |   -- C_drive.zip
    |   |-- before
    |       -- C_drive.zip
    -- kape
        |-- after
        |   -- dcserver.zip
        |-- before
            -- dcserver.zip
Analyze collected artifacts
Now that artifacts have been extracted from the simulated environment, it's time to check if attack traces are correctly captured. Fortunately, M&NTIS allows to retrieve actionable information regarding the attack scenario, and especially the metadata of each played attack steps, this information can help understand if the collected artifacts match with the attack scenario.
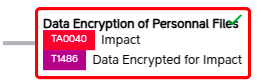
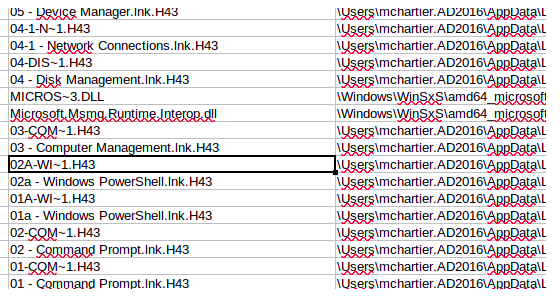
Thanks to DFIR-orc, it is possible to list all files in a disk and export it to a .csv file. As an example, we can inspect the "before" ransomware state of the dcserver machine. Some ransomwares use a custom file extension after encrypting a file. Using a custom script, it is possible to extract all of the file extensions used on the disk. According to the M&NTIS platform, we know that the ransomware is correctly executed:
There are multiple artefacts which can be collected during such a dynamic analysis. In order to check the impact of the ransomware on the files, we want to verify the file extensions in the "after" step (i.e after the ransomware execution). As presented in the collected file list from DFIR-Orc, we can see a new file extension appearing: .h43. It is widely used on the personal files of the dcserver. The DFIR-Orc forensic tool successfully listed the files with the correct new extension after the ransomware was triggered.
Another artifact could to gather the Prefetch folder (if available) to check the files executed before and after the ransomware triggering.
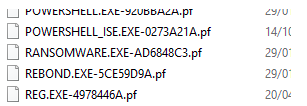
To retrieve the prefetch files, you could perform the next command in the deploy-dfir playbook before and after the pause. Multiple files can be retrieved in a single pause and exported to the HTTP server.
DFIR-Orc_x64.exe GetThis /sample="*.pf" /out=prefetch.zip C:\Windows\Prefetch\ /nolimitsConclusion
In this test case tutorial, we have seen how to test tools and procedures for DFIR and CERT, from the lab creation to the artifact analysis. Thanks to the M&NTIS platform, it is now possible to train a team, automatize tool testing and so on.